
We've been running our Make Your Own Lampshade and Bottle Lamp Workshops for just over two years, and had so much fun with them! We've had over 300 people through our doors at Braw Wee to make their own, so we have decided to pull together our guide and extra wee tips in this handy blog post for those who can't make it along or those that need a wee reminder of the workshop!
You can find out more or book onto a workshop here! Or buy a kit here!
How to Make a 30cm Lampshade
What you need
- Half a metre of fabric of your choice (we recommend a cotton for your first go).
- Lampshade Making Kit which contains Self-Adhesive PVC Panel, 1 Utility Ring, 1 Metal Ring, Double-Sided Tape & a Finishing Tool.
- A pair of fabric or Sharp Scissors
- A clean flat working area.
- An Iron & Ironing Board (sorry – we all hate ironing!)

Steps
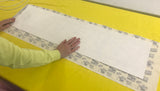
- Iron your fabric to rid of any creases (ask a neat friend, parent or similar if your unfamiliar with this technology) and lay the fabric face down and position your PVC panel on top of your fabric so that the plastic is covering the area you want to see on your Lampshade.
(Tip – you’ll see two the panel has two creases on each of the long sides, you won’t see this bit of the fabric when it is finished).
- Once you are happy with the placement, peel back the release paper (the grid side of your PVC) to reveal the sticky side of the PVC and stick it down on your fabric. You want to do this slowly in small sections smoothing the fabric gently as you go – if you feel a crease then pull it back, straighten your fabric and retry (can be a wee bit fiddly at first – just take your time).
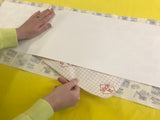
- Once you are happy that there are no creases and your pattern is on the PVC straight, then you are ready to trim your fabric down to around a few mm from the edge of the plastic. Leaving two longer tabs of approx. 1cm at one of the short ends.

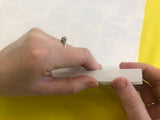
- Snapback your creased edges (or kiss cut as it’s known to us lampshade geeks!) to break the edge of the PVC and carefully remove the strips on either side to leave your fabric edging. (Note there should be no glue left on the fabric – you are going to tuck this in to finish your shade later). Keep one of these PVC strips to one side, sticky side up – we’ll be using it later!
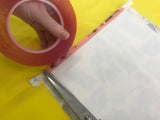
- Apply the double-sided tape to one of the short sides of the PVC panel – this is the side that you’ll see on the seam of your lampshade so check what the pattern will look like. If we are using light cotton, we leave a little more on this side and fold it over the edge, using some double-sided tape to hold it in place.
- Apply the double-sided tape to the outside edge of both of the rings, smoothing and pressing the tape as you go. If you do the one with the Utility Ring first you can sit it down without it sticking to your work surface.

- Place your fabric panel in front of you, remove the red covering from the double-sided tape on the rings and place them on the edge of the PVC (not on the Fabric – it will look rubbish when you go to do the finishing).
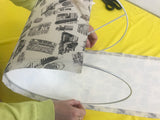
- Slowly roll the rings along the edge of the PVC towards the edge with the double-sided tape for your seam (get a wee pal to help at this point if you want), keeping in line with the PVC edge at all times. If you start to go a bit squint, then just roll them back and correct.

- When you get close to the seam (the overlap) then remove the red layer of the double-sided tape and gently press them together from the centre outwards. At this point you’ll start to get really excited as it is looking like a real lampshade!

- The next step is to snip the covering in line with the struts on the utility ring, so the fabric can be folded behind it.

- Pinch the fabric that is left visible and smooth it over the tape on the rings, trying to avoid any big creases.

- Find your Finishing Tool (it is the white bit of plastic that looks like a giant plectrum), and using the pointed edge push the fabric behind the ring and in front of your PVC. This is the most labour-intensive bit of the process, and at first, can be a right pain and sore on the fingers – take regular breaks for slurps of tea or gin – whatever is your preference. Keep going until you are happy with your finish – I promise that all of the material can be hidden behind the rings!

- We have one last step – remember when you put that PVC strip to one side, well get that and cut a length that is slightly shorter than the height of your lampshade. And then place this inside along the internal seam (you can put some more double-sided tape on it if it needs some extra stick). Firmly pressing down your seam at this point to ensure it is firmly attached.

- Jump up and down with joy, that you’ve completed your first Lampshade and get it up on Instagram straight away to show all your pals what a crafting master you are!

1 comment
Do you sell the kit to make lampshade bottle? Came to workshop but want to make another one, if so how much are they x